Radare [1] is an open source and multi-platform framework for Reverse Engineering activities which supports assembly and disassembly many architectures and binary formats [2]. As any other reversing framework, Radare framework aims to recognize high level features on machine code, such as: data structures, functions and execution flows. Radare has buildings for the most populars Operating Systems, such as: Microsoft Windows, Mac OS X, Linux, BSD, iPhone OS, Solaris and MeeGo. Figure 01 presents the main command line interface for Radare.
 |
| Figure 01: Radare command line interface |
Radare offers few options of interactive graphical interfaces, such as: Web, GTK (Python) and ASCII-Art graph. Another very useful characteristic due to its designing is the capacity to easily implement new architectures, binary formats and analyses [3][4]. Radare provides an open API and with many bindings for many programming languages, such as: Python, Java, Ruby, Go and Perl. Radare is also integrated with the most popular debuggers supporting local and remote debugging [5], such as: gdb, rap, webui, r2pipe, winedbg and windbg.
This post aims to presenting a comparison between reverse engineering features from IDA pro [6] and Radare 2. We are going to discourse in which situation it is more appropriate to use each tool. This article can be used as a condensed user guide for Radare (a complete guide is available online [7]). This post can be used also as a reference guide once the above mentioned official guide is outdated and most examples do not work with the most recent version of Radare any longer. In this small tutorial we show the main functionalities of Radare in practice by solving a small "crack me" challenge.
The first comparison point is in case the analyst is more comfortable with command line interfaces and quick scripting features. Radare is very customizable and allow scripting characteristics and "piping" outputs to default Unix executables, such as: "wc", "more", "less" etc. This feature will be discoursed in more details in future.
The framework is essentially composed by 7 executables:
- rax - responsible for converting numbers (e.g. string to hexadecimal, decimal to hexadecimal etc);
- rahash - block based hashing utility;
- rabin - responsible for extracting information about binaries;
- rasm - assembly and disassembly from the shell;
- rafind - binary file search and edit tool;
- radiff - responsible for differential analysis. Very useful for analyzing patches;
- radare2 - main executable which combines all above mentioned binaries.
Before discourse about the main executable and its main features it is necessary a brief introduction about each secondary application once all of them are connected and used on demand for analyzing binaries.
.::[ rax2
rax is a small command line executable responsible for converting numbers. It also supports "endianess" and can be used as a shell if no arguments given. Figure 02 shows an usage example of rax2.
 |
| Figure 02: rax2 usage examples |
.::[ rahash2
rahash2 is a utility to calculate, check and show the hash values of each block of a target file. It allows the analyst to calculate a hash for large files and specific portions of files as well. Figure 03 shows the command line usage of rahash2.
| Figure 03: Rahash output for a SHA256 hash of /bin/ls executable on MAC OS X |
rahash is integrated with radare and can calculate many different types of hashing algorithms, such as: md5, sha1, sha256, sha384, sha512, crc16, crc32, md4, xor, xorpair, parity, entropy, hamdist, pcprint, mod255, xxhash and adler32. This tool can be useful for checking integrity during patch analysis.
.::[ rabin2
rabin is a tool to extract information about binaries. With rabin it is possible to extract information about binary type, architecture, binary properties and operating system information. It is also possible to extract information about entry point, import table, symbols, strings, sections and libraries. Figure 04 shows usage examples of rabin2.
 |
| Figure 04: rabin2 usage examples |
.::[ rasm2
rasm is a small tool for inline disassembly and assembly. It is possible to transform a sequence of hexpairs in legible instructions and legible instructions in a hexpairs. This application can be very useful as an alternative for creating shellcodes. Figure 05 shows an usage example of rasm. This figure shows the generation of hexpairs for x86 architecture and converting the same values back to the high level assembly instruction format.
 |
| Figure 05: rasm2 usage examples |
The parameter "-L" can be used to get a complete list of supported architectures. Each architecture is implemented within Radare through Plug-ins. This means that Radare capabilities can be easily expanded through plug-ins. Radare supports around 50 different architectures from z80 to 8051.
.::[ rafind2
rafind is a command line component of Radare to find string patterns inside a binary file. It allows the analyst programmatically search for strings or hexpairs. Figure 06 shows rafind command line syntax for searching a string pattern inside the "ls" binary. rafind2 returns the offset and the found string pattern.
 |
| Figure 06: Command line syntax for searching a string pattern |
radiff is a tool used in Radare to identify changes and delta offsets between 2 binaries. This tool can be also used to analyze and generate binary patches. Figure 07 and 08 show a normal unix diff of 2 source code files and the command line syntax for a delta differentiating analysis of 2 binaries. By observing Figure 07 we can notice that there is a changing from 0x31 to 0x32 (ASCII hexadecimal code for "1" and "2" characters) on offset 0x00000f9a and an CRC adjustment on offset 0x00000480.
 |
| Figure 07: unix diff of 2 C source code files |
| Figure 08: radiff2 command line syntax |
Another very useful functionality of radiff2 is binary patching. By using the parameter "-r" it is possible to generate a file containing a sequence of Radare commands to transform the first binary into the second one. Figure 09 shows an example of a binary patching operation. The parameter "-r" was used to generate "wx" Radare commands and pipped straight to radare2 to modify the example01 binary.
 |
| Figure 09: binary patching using radiff2 and radare2 |
.::[ Radare2
Well, I know, it was a long journey until this point. All this information will be very useful for understanding the Radare framework and its main features. Besides that, all components can always be used in a stand-alone mode for automating general tasks. Now is time to put all together.
To demonstrate functionalities of Radare a small "crack me" application was developed. We going to perform 2 main task in this small challenge:
- Identify the used password;
- Patch the binary to bypass the authentication mechanism;
Figure 10 shows the source code for the binary containing few validation mechanism and the conditional block which checks the inputed password.
 |
| Figure 10: source code for the used "crack me" example |
After compile the above mentioned source code it is possible to load the binary through the radare2 command line command. Figure 11 shows the binary loaded into radare and how to collect basic information about the analyzed application.
 |
| Figure 11: loading binary |
It is possible to observe also few features from this image, such as:
- the command "i" (abbreviation for information "info" or "information") shows general information about the binary. This command uses the "rabin2" component;
- commands in radare can be "piped" to shell commands. As we can observe the combination of the information directive with the unix command "grep" in order to select relevant information about the binary;
- it is possible to execute external commands by using the exclamation directive "!" (this same information could be obtained by using the directive "ie");
- The address marked in yellow is the current analyzed position in the binary. Radare initializes this address with the entry point address.
The directive "i" is very useful and can return a set of important informations, such as: import table ("ii"), entry points ("ie"), symbols ("is") and sections ("iS"). For instance, Figure 12 shows a map of all sections, their addresses, sizes and permissions within the analyzed binary.
 |
| Figure 12: Sections map |
Differently from IDA, radare by default does not perform a function analysis automatically when started. This analysis can be very handy for when analyzing well formatted binaries like the example presented in this tutorial. Figure 13 shows the outcome of the function analysis.
 |
| Figure 13: function analysis output |
The command "af" executes the function analysis which will try to identify all function structures inside the analyzed binary (the command "aa" could be also used to execute all analyses provided by radare). The directive "afl" lists all functions found within the analyzed binary and "afi" shows information about the current function pointed by the current address ("0x100000dd0"). As we can see, information about "sym._main" function was collected, such as: starting address, size, complexity and call references. A very useful information is the call references which contains all address for all calls to this specific function. All these information is also available on IDA through the graphical interface.
The next relevant functionality for this tutorial is how to list disassembled code for an specific address. This functionality is achieved by using the command "pd" ("print disassembly"), among many parameters this command can receive the number of instructions to be disassembled or a name for a function. The variant "pdf" shows the code for the current function. Figure 14 shows the first 20 lines of the sym._main function.
 |
| Figure 14: first 20 disassembled lines for the sym._main function |
It is possible to observe that Radare's analyses adds comments to the disassembled code, such as:
- an stack analysis to identify parameters of the current function;
- visual pointers to all kind of jumps;
- comments with contents for pointers to strings;
All this features are also present in IDA. The only difference is about user interface. IDA is more user friendly and easy to navigate due to its graphical interface. Another advantage of IDA is the easy access to annotation features. The user can add, remove and change metadata in a more intuitive way through its graphical interface.
For now, we have all necessary resources to solve our first task. Let's move on.
.:: [Task 01: finding the password
By analyzing the code we can verify that the binary is composed by a single monolithic block of code composed by the function "sym._main". We could solve this task by using many different approaches but let's follow a top-down strategy (the recommended one for reversing in general). The approach adopted in this section follows the following methodology:
- first we will try to find plain text password patterns inside the some specific sections;
- find the code which triggers the flag;
- analyze the code in a reverse way for understanding what is necessary to reach the flag.
The step one can be performed by the command "iz" which prints all strings inside data Sections or the command "izz" which prints all strings inside the whole binary. Figure 15 shows all strings inside data segments within the binary.
 |
| Figure 15: strings inside data segments |
We could not find any pattern of passwords or something used as key for triggering the flag. Clearly all messages found are general check and the flag message.
Alright, no success on trying to find the plain text version of the password in strings. Next step is investigate the code around the flag message. Figure 16 shows a call to "strncmp()" function which is a decision point to branching into the flag message.
 |
| Figure 16: Assembly code for the call of strncmp() function |
strncmp() receives to pointers to strings and an integer, compares "n" characters and returns zero if both strings are the same. We can notice from address 0x...eac to address 0x...eb7 that the this functions receives the integer 8, and the addresses stored at "rip + 0xd1" (static address located at 0x...f7d) and "rbp - local_2 + 8" (second element of argv) as strings to compare. By observing this parameters it is possible to state that the password necessary to trigger the flag has 8 characters.
Another important detail to observe is the content of the 8 first bytes at the address 0x...f7d. In order to move the cursor to a specific address it is necessary to use the directive "s" (set). At this address it is possible to find 8 non printable integer values otherwise the step 1 would get something. Figure 17 shows the outcome of printing the first 8 bytes of 0x...f7d.
 |
| Figure 17: hexadecimal dump of 8 bytes from the address 0x...f7d |
It is possible to observe the sequence of 8 bytes: 0x88, 0x99, 0x8b, 0x8b, 0x8f, 0xc8, 0x8a and 0x8c. The command "px" print an hexadecimal dump of n bytes from the current position. This sequence is compared with the 8 character password inputed by the user. These characters are not printable according the ASCII table. This probably means that the user input goes to some kind of transformation before be compared with these 8 bytes. According to our methodology, this move us to step 3 and analyze blocks of code immediately above the comparison instructions. Figure 18 shows the block of code to be analyzed immediately above the strncmp() call.
 |
| Figure 18: input transformation code immediately above |
This code iterates over the variable stored inside "rbp - local_2 + 8" (second value of argv or the user input) and overwrite each character with a copy of xor operation of itself and the value "0xf8". This code reveals a cryptographic key. The resulting value stored in argv[1] then is compared with the value described above using strncmp(). So we can state the following pseudocode:
strncmp( (char *) xor(<password>, 0xf8), (char *) 0x...f7d, 8)
In order to satisfy the following condition and find the original value of password we should:
*xor(password, 0xf8) == *0x...f7d
which can be transformed to:
*password == *xor(*0x...f7d, 0xf8).
the resulting operation is:
[0x88, 0x99, 0x8b, 0x8b, 0x8f, 0xc8, 0x8a and 0x8c] ^ 0xf8
which is equal to:
[0x70, 0x61, 0x73, 0x73, 0x77, 0x30, 0x72, 0x64] == "passw0rd" // (in ASCII)
Voilà! We have recovered the password. Figure 19 shows the output of the challenge by using the recovered password as input.
| Figure 19: execution of the challenge binary by using the recovered password |
.:: [Task 02: patching the binary
The second task is patch the binary in order to bypassing all validations and trigger the flag without the need of a password. As we discoursed before (radiff2 section), Radare has features to modify binaries and generate patch files.
In order to accomplish this task it will be necessary few "tricks". This solution patches the binary to trigger the flag without change its original size.
The first modification is to find out a way to skip first validation block which counts the number of parameters passed to the the binary. our goal is to make the binary trigger the flag without any parameters. Figure 20 shows the first block to be bypassed.
 |
| Figure 20: Bypassing parameters counter check |
The red rectangle shows exactly the piece of code which need to be changed. the constant 0x2 located at "0x1...de9" should be modified to 0x1 in order to skip bypass the block in case the binary is executed without any parameters (basically is replace "argc == 2" by "argc == 1"). Now the binary can be executed without parameters.
The next step is find out a way to skip the block which check the size of the password inputed by the user. Figure 21 shows the block responsible for this check.
 |
| Figure 21: Bypassing password size checking block |
In this case we changed the parameter for strlen() to receive "argv[0]" (the name of the binary) instead "argv[1]" ("rax + 8" to "rax + 0" - remember that we are working in a 64 bits architecture). As we know that the size of "argv[0]" will be always 11 we could change the comparison parameter to this value instead 8. This comparison will always return true as long as the name of the binary keeps unchanged. Basically it was necessary to change the byte "0x1...e19" to "0x0" and the byte "0x1...e21" to "0xb" (11 in decimal).
Ok, right now our binary is skipping the parameter counter and the password size validation check.
The next validation block to be skipped is the decryption block, which iterates over the inputted password and makes a xor operation of each character with "0xf8". Figure 22 shows the decryption block.
 |
| Figure 22: bypassing decryption block |
Our strategy was:
- change the initialization value of the iteration counter to any value bigger than the size of the name of the binary (11 or 0xb);
- change the parameter of strlen() to point to argv[0] instead of argv[1] (does not exist anymore).
To accomplish this goal it was necessary to modify the byte "0x1...e46" to "0xc" (any value bigger than 0xb - the size of argv[0]). And change the parameter of strlen() from argv[1] to argv[0] by modifying the byte "0x1...e55" to "0x0". With this alteration the decryption "for" looping will be always skipped as long as the binary file name keep unchanged.
Finally, the last block compares the content stored in argv[1] (which does not exists anymore) with the password. Figure 23 shows the code block responsible for this last check.
 |
| Figure 23: bypassing strncmp() checking |
For by passing this check, first we changed the "number of bytes" parameter passed to strncmp() to 0. According to the documentation strncmp() always returns a match if this parameter is equal to zero. To accomplish this goal we changed the byte "0x1...ead" from "0x8" (the size of the correct password) to "0x0". The second alteration is change the another parameter of "strncmp()" from "argv[1]" to "argv[0]" once the first does not exists anymore. The byte located in "0x1...ec0" must be changed from "0x8" to "0x0".
In order to deploy all this changes in a concrete Radare patch we need to analyze offsets into the binary file in disk. This task can be done by open the binary in a writing mode by passing the "nw" parameters to Radare. Figure 24 shows how to load the binary in a writing mode and how to make the first change described in this section manually.
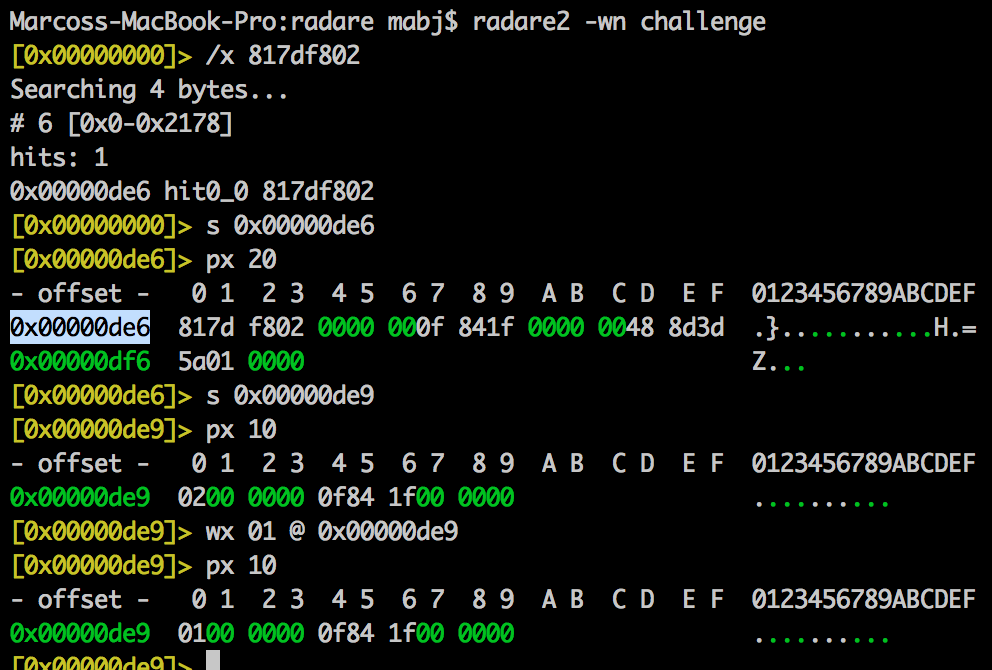 |
| Figure 24: binary loaded into Radare's writing mode |
First it was necessary to find the instruction which needs to be changed by using the command "/x <hexadecimal pattern>". This command provides the offset of each match inside the binary file. In this case the offset was "0x00000de6". As we need to modify the fourth byte from "02" to "01" it is necessary to add 3 to this offset which results in "0x00000de9". Now we applied the patch by using the command "wx 01 @ 0x00000de9". This commands tells Radare to change the byte at this address to the value "01". We can see the result of this changing in the last line.
If we repeat this same process for all necessary changes we can have a crack for the proposed binary. The final patch is:
wx 01 @ 0x00000de9
wx 00 @ 0x00000e19
wx 0b @ 0x00000e21
wx 0c @ 0x00000e46
wx 00 @ 0x00000e55
wx 00 @ 0x00000ead
wx 00 @ 0x00000eba
Figure 25 shows the application of the proposed patch against our original binary and the execution after patching.
 |
| Figure 25: cracked binary execution |
.::[ Conclusions
Radare is a very robust framework for Reverse Engineering suitable to the most diverse tasks from malware analysis to copyright software analysis. I would recommend the use of Radare in the following situations:
- if the analyst prefer command line interfaces with keyboard shortcuts for all actions;
- in case of reversing old cartridge roms. Radare has support for a big range of old processors used by many 90's devices;
- diffing and patching tasks;
- a tool supported in many platforms. For instance, for this post Radare framework was installed in a Mac OS X;
- low budget projects and scientific research: cost zero and open source! Analysts can always customize and contribute to make the tool more effective.
- crack and reversing challenges;
- for applications which demands code emulation.
.::[ References:
[1] http://radare.org/[2] https://en.wikipedia.org/wiki/Radare2#Supported_architectures.2Fformats
[3] https://github.com/radare/radare2/wiki/Implementing-a-new-architecture
[4] https://github.com/radare/radare2/wiki/Implementing-a-new-analysis-plugin
[5] http://solidsec.blogspot.de/2015/09/reversing-elf-binaries-remote-debugging.html
[6] https://www.hex-rays.com/products/ida/
[7] http://radare.org/get/radare.pdf
[8] https://www.blackhat.com/presentations/bh-usa-08/Shacham/BH_US_08_Shacham_Return_Oriented_Programming.pdf
No comments:
Post a Comment