This post presents an analysis for a sample of the crypto-virus known as CryptoWall 3.0.
.::[ ARTIFACT CHARACTERISTICS
Table 1 shows general information about the analyzed binary.
Characteristic | Value |
File name | sample1.xxx |
MD5 | 15914886232c164bb2521af59aa0e06e |
SHA1 | cdff1327225a6a721e32f204ad1e4eb3a4a1d44e |
Size | 220 KB |
Binary type | PE |
Architecture | x86 |
Bits | 32 |
.::[ GENERAL DESCRIPTION
The analyzed sample represents a variant of the CryptoWall malware delivered as payload by Angler Exploit Kit. There are some more elaborated analyses about this malware around the Internet [1][2][3].
CryptoWall is categorized as a ransomware by most anti-virus technologies. Its main behavior is:
- run some "anti-debugging" techniques (e.g. verifies if the caller process is Perl or Python);
- deactivate native OS protections;
- deactivate backup and file snapshotting policies;
- start communication with C&C server;
- generates a temporary crypto key for each request;
- Uses this key to encrypt (RC4) the communication between the infected machine and the C&C server. This key is passed as parameter inside each HTTP request;
- sends an unique identification of the infected machine to the server (called "CUUID");
- the server sends back a public key and an unique image used to link the infected machine to its server side session;
- this process uses this public key to encrypt specific files inside the disk of the victim (according an extensions table);
- the malware redirects the victim to a web page where the user can pay (in Bitcoins) to obtain the private key and recover the encrypted files;
- the malware deletes itself (files remain encrypted);
Once the amount requested is paid the user receives a private key which can be used for recovering the encrypted files.
.::[ DYNAMIC ANALYSIS
The first step in order to understanding the general behavior of the artifact is to load it into a sandbox environment. We used the Cuckoo Sandbox for this task (in this case we used malwr.com).
As expected, according the available documentation about this malware, we could observe all main documented characteristics of CryptoWall.
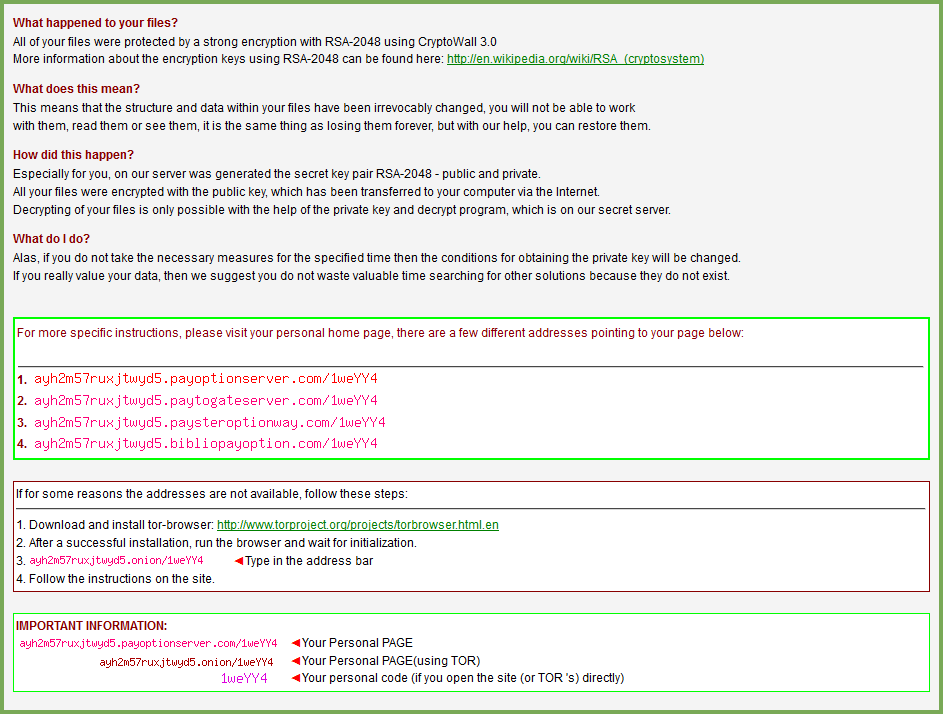
The first evidence is the high amount of changes at the filesystem. According to Cuckoo, 5.069 files were modified. Another key characteristic for CryptoWall is several copies of files containing instructions regarding how to decrypt the files and how to make the payment. Figure 1 shows a instance of these files into the sandbox disk.
 |
| Figure 1: CryptoWall instruction files for decrypting the compromised content |
Figure 2 shows the content of the plain text version of this file. We can see that the file describes, in a user friendly way, exactly what happened and how the user should proceed to make the payment.
 |
| Figure 2: CryptoWall instruction files content |
There are copies of these files every where inside the infected machine. These files can be used as a evidences to detect if the machine was compromised by CryptoWall.
The second evidence is the processes stated by the malware. After preliminary checks and self-protection actions, CryptoWall creates an instance of "svchost.exe" and inject it main payload inside this process. All the main activities of this malware is performed by this process. We can observe this characteristic by analyzing the malware behavioral analysis results. Figure 3 shows the processes spawned by CW3.
 |
| Figure 3: Processes started by CryptoWall |
Table 2 shows the total amount of actions (network, filesystem, registry, process, services and synchronization) performed by each of these processes.
Process | Actions |
sample1.xxx | 185 |
explorer.exe | 609 |
svchost.exe | 158389 |
vssadmin.exe | 36 |
These totals and by analyzing the content of each action is possible to affirm that the main activity of the malware is performed by the svchost.exe process. This information is useful for defining a more effective approach for static analyzing the artifact.
The next step was to analyze network traffic. The sample connects to 2 servers:
- ip-addr.es - used to determine the location of the infected machine in order to provide customized payment instructions to the user;
- agsigh.com - used as remote server where the infected machine identifies itself and requests the public key used for encrypting files.
It is possible to download a PCAP file containing all network traffic during the sandboxed analysis. We decided to analyze the PCAP file by using Wireshark. The malware uses HTTP as protocol. Figure 4 presents all inbound HTTP traffic registered by our sandbox environment. We could observe the initial HTTP request made for "ip-addr.es" and the other 3 requests to the CW3 remote server "agsigh.com".
 |
| Figure 4: Network traffic captured by the sandbox. |
The traffic transmitted to the remote server is encrypted by using RC4 which is a Symmetric encryption algorithm. This means that somehow the client has to send the key to the server. After reading some documentation online I could figure out the heuristic used by the malware to obfuscate the communication. This heuristic follows the steps:
- the malware generates a random RC4 string containing 10 to 15 characters;
- this string goes as URL parameter during the HTTP request;
- The ordered version of this string is used as key to encrypt and decrypt the traffic. For instance if the string is "jihgfedcba" the encryption key will be "abcdefghij";
- the content will be injected as a form parameter identified by the last character of the key;
- the same key is used to decrypt the inbound and outbound traffic;
This heuristic means that all traffic between the remote server and the infected machine can be decrypted and analyzed - including the cryptographic key sent by the remote server.
Figure 5 shows the structure of this HTTP POST to the remote server. The random string (which generates the encryption key) and the encrypted content is marked with a red rectangle.
 |
| Figure 5: CW3 HTTP POST structure |
We created a script in Ruby to decrypt CW3 traffic. Code 1 shows the source code for the script used to decrypt CW3 traffic.
Code 1: Ruby script used to decrypt CW3 communication protocol
 require 'rc4'
 if ARGV.size != 1
  puts "Usage: #{$0} <key>|<content>\n\n"
  exit 1
 end
 (key, cypher_text) = ARGV[0].split('|')
 key = key.split('').sort.join
 rc4 = RC4.new(key)
 s = cypher_text.scan(/../).collect{|x| [x.hex].pack('C')}.join
 puts rc4.decrypt(s)
By using this script we could be able to recover all the communication between the infected machine and the remote server. Code 2 shows the execution output for the proposed decoder.
Code 2: Ruby script used to decrypt CW3 communication protocol
 rc4 mabj$ ls
 cw3_decoder.rb     cw3_input.dump
 rc4 mabj$ head cw3_input.dump
 jg29o6mk639|b42365bcdcfddf6606f935fa0d520993e86d9ebbf0735b7b ...
 02bk27i91c|1be7d5ee6b7ea8a5e44cca49ea955105f4fae250add785e8a ...
 p4q4z7yqgd|dcf96963bdd535bb0aeace22c4471f9a9cca91b64dd281e17 ...
 rc4 mabj$ for l in `cat cw3_input.dump`; do
 > ruby cw3_decoder.rb $l
 > done
 {1|crypt13|B834AFC69086975FED56B5B9BB7221A0|2|1|2||184.105.143.147}
 {7|crypt13|B834AFC69086975FED56B5B9BB7221A0|1}
 {7|crypt13|B834AFC69086975FED56B5B9BB7221A0|2|C2703E2BE050CF772...}
The first message sends the campaign ID ("crypt13"), an unique identification ID (also known as CUUID - "B834AFC69086975FED56B5B9BB7221A0") and location of the infected machine (IP address). Code 3 shows the acknowledge answer for the first HTTP POST message.
Code 3: Remote server answer for the first request
{195|1}
The second request ask the remote server for the RSA public key used for encrypting the files. Code 4 shows the answer containing the public key and a TOR link to be used for the payment messages.
Code 4: Remote server answer for the second request
 {148|ayh2m57ruxjtwyd5.onion|1weYY4|US|-----BEGIN PUBLIC KEY-----
 MIIBIjANBgkqhkiG9w0BAQEFAAOCAQ8AMIIBCgKCAQEAz8fTAbhH+YJ4PSDE31Jx
 jiB+OD7Zd63phsidwtSGfb1Ovr3b34DVdnDW2a7e3dMgORQKbMnsJssCmwEwlJGe
 rIvYOSTd2NgucXrB3ng1dAoaEHz7zZC6UgiYBZEc5BL1c+nhOmUiS4DA7nfDo4EP
 GmNyH5zxb5/gbAlVgvzpjcseEpIemZNfPp3rVyF1l5q9j33TOukZQtWewkRv/e19
 Gqv/4RYoRLMBlphbhLl/z3b6Zw56+wPIL0z+1PKF7I7oGsqFJdUEipTK4bcKv1j1
 WjJ4wVBL3Lh6L8d7XODcgxkITmydt4smvGUl28AK8q+a9fjJo3ERAQ2oJAtBJ4/F
 dQIDAQAB
 -----END PUBLIC KEY-----}
After the third request the remote serve sends a "splash" PNG image containing information about the payment. Figure 6 shows the customized PNG image returned by the server.
 |
| Figure 6: Customized image generated by CW3 server |
Would be a nice exercise to implement this decoder as a plugin to generate more accurate signatures for a layer 7 package inspection firewall or IDS in order to block the malware traffic with the public key (this would cause a relevant network overhead, also).
At this point, we could be able to extract all main information for this malware. The only question not answered is the list of all possible control servers within this specific sample. An a valid approach to obtain this list dynamically is run the malware in a sandbox environment with all traffic blocked by a firewall. We tried this approach by using a combination of a Microsoft Windows 7 VM, Process Explorer and Procmon. It was possible to identify 50 remote servers. Table 3 shows a list with all remote servers found by sniffing my virtual machine.
104.27.185.76 | genedillardart.com |
104.28.18.8 | geringer.eu |
agsigh.com | gettabletsnow.com |
albanianbakery.com | gjimnazicambridge.com |
antistatikzeminkaplama.com | glutenfreecafegirl.com |
anxley.icodedark.com | guessthesportsteam.com |
aok123.com | delgadillo.com.mx |
aokvision.com | healthyairmasters.com |
aster-toshiko.com | waterdamagefortlauderdale.info |
atlpvt.com | ikecotrina.com |
bdcaindia.com | footbe.ru |
bisvel.com | jamiemeagher.com |
breastaugmentationnow.com | kanooneservat.com |
byteorders.com | khanggiaorder.com |
comerentenerife.com | kodehelp.com |
davidzollmusic.com | la.nonpac.com |
definitelymale.com | leathertabi.net |
hcows.com | licenciaparaimprimirdinero.com |
demo.smointernational.com | meltemsatun.com |
dillardvideo.com | metrshop.ru |
diputacion.ardinova.com | multylighting.com |
eclipsehair.com | nationautopart.com |
electjasonsmith.com | pimss.nl |
extraescolaresdilosport.com | victoriaro.ru |
hiringyou.us | waterdamgespokane.us |
.::[ STATIC ANALYSIS
The main binary was loaded into IDApro without presenting any error. It is possible to observe that most of the binary is composed by an encrypted, payload which will be decrypted, uncompressed and injected inside svchost.exe. Figure 7 shows the segments layout for the analyzed binary.
| Figure 7: Binary segments layout. |
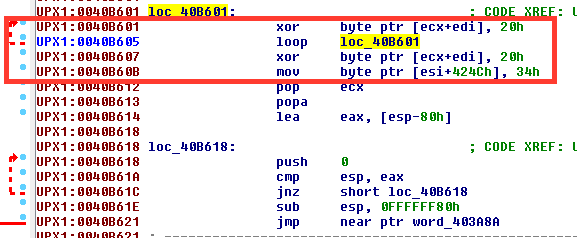
Figure 8 shows a sample of the obfuscated code stored at the ".text" segment (which is a read-only segment).
 |
| Figure 8: Obfuscated code that will be inject into "svchost.exe" |
The main binary implements few obfuscation and anti-debug strategies. Figures 9 shows an example of obfuscation strategy implemented by the sample. The code continuously load random values into the same register just to make the code more difficult to understand what is really loaded into each register.
 |
| Figure 9: The code contains a big amount of of dead portions. |
We could recover the cryptographic key and analyze the malicious code obfuscated at the data segment. However a hybrid approach (described below) was more effective.
As we know already that most of the malicious tasks are performed by the svchost.exe process, we decided to use 2 approaches to analyze this executable.
- Suspend the process and try to attach it to IDA;
- Dump the process by using Process Explorer and analyze the content.
We could find an array with 60 elements with all remote servers used by the malware. This means that we could find out 10 more remote servers besides the ones we could spot by using a dynamic approach. Table 4 shows the new servers identified through static analyzing the malware. The full list with all remote servers can be found [HERE].
elcoachingempresarial.com | enbuscade.org |
furniturerowstores.com | hullukusagi.com |
leadershiptrifecta.com | maestriaenalianzasestrategicas.com |
pcgamingkeyboards.com | suzuki.geringer.eu |
victoriaro.com | wallpapers-hd.us |
Figure 10 shows the array structure containing the remote servers for the analyzed sample.
 |
| Figure 10: Memory structure used for storing references to all remote servers. |
We could spot another very interesting behavior - the malware targets a list of 476 financials, governmental and NGOs (!?) institutions to be used as reference for finding sensitive data inside the users cookies. This information can be used for intelligence purposes. Figure 11 shows the data structure in memory used to hold this information. The full list of targets can be found at the [HERE].
 |
| Figure 11: Targeted financial/governmental/NGOs institutions. |
The injected binary is very plain and with all static strings in plain text inside what makes easy to inspect just through a quick look at the strings generated by the process dump. It was possible to spot all information gathered during the dynamic analysis.
.::[ SUMMARY
Table 5 summarizes the findings for this analysis. Characteristic | Value |
File Name | Sample1.xxx |
Classification | Trojan horse |
Type | Ransomware/Cryptovirus |
Family | Cryptowall |
Campaign ID | Crypt13 |
Conrtol Servers | Control servers.txt |
Crypto keys and scheme analysis | Described before |
Decoder | |
Targets |
.::[ TOOLS USED
This section lists the main tools used to perform this analysis. This information is necessary to guarantee reproducibility of the experiment.
- IDA 5.5 (freeware version)
- Radare2 Framework
- SysInternals Tools
- Virtual Box
- Windows 7 professional
- Cuckoo Sandbox
- Malwr.com
- VirusTotal
- Wireshark 1.12.7
.::[ REFERENCES