Continuing the series of posts about the FlareOn reversing challenges
2015 [
1]. If you interested, you can find my previous post with solutions for the first three challenges
here [
2].
I had some "extra work" due to infra-structure issues during this challenge and ended up learning new things. So I decided to dedicate a whole post for the challenge #4 not only explaining the solution but also explaining these issues.
.::[ PREAMBLE
As the previous challenges the objective in this task is to recover the flag (an
e-mail address) from a
PE-32 binary file. The main insight for this challenge is that the binary was packed using
UPX [
3]. There are many ways to raise evidences that a binary was packed using
UPX, the main is to examine sections. We could obtain this information using
rabin2 by the following command. Figure 01 shows the sections labels for the analyzed binary.
 |
| Figure 01: Sections information for analyzed binary. |
As we can notice there are
2 sections (marked with the red rectangles) called "
UPX0" and "
UPX1". These sections are used by
UPX to store compressed data of the original binary.
UPX standard package offers an utility to unpack the packed binary. Basically this tool reads the
UPX headers (out of the scope for this post) and extracts the original binary to an output file. The main advantage of using
UPX is to reduce the size of an executable by compacting it. This compressed version of the binary is uncompressed in memory and executed during run-time. This means that the packed executable has the decompression algorithm and a mechanism to change the execution flow to the uncompressed version of the binary during execution time.
.::[ UNPACKING UPX
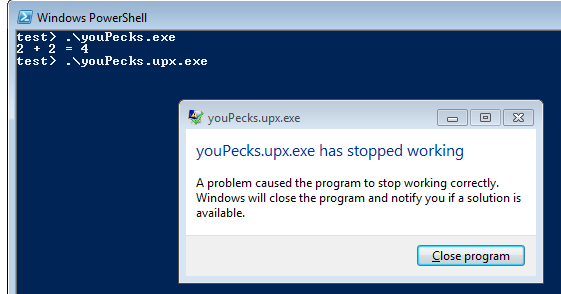
At this point we already know that we have an UPX packed binary. The binary executes perfectly packed at our test environment (
Microsoft Windows 7 - 64 bits). The issues happens when we tried to unpacking and executing the resulting unpacked binary using this Virtual Machine. Surprisedly the resulting unpacked binary does not work anymore. Figure 02 shows the command line used to unpack the challenge and the checksum for the unpacked version of the binary.
 |
| Figure 02: Command line for unpacking binary and MD5 |
Figure 03 shows the error presented when we tried to execute the unpacked version of the binary.
 |
| Figure 03: Execution error of unpacked version of the binary |
This was very curious, we analyzed the unpacking code and the uncompressing routine was fine. Then we decided to execute the unpacked binary in different platforms, such as:
- Microsoft Windows 7 - 32 bits
- Microsoft Windows XP - 32 bits
The same error occurs when we tried to execute on
Windows 7 - 32 bits. The unpacked binary was executed without any error on
Windows XP - 32 bits. Figure 04 shows the execution of the unpacked binary under a
Windows XP - 32 bits environment.
 |
| Figure 04: Executing the unpacked version of the binary in a Windows XP - 32 bits |
This situation raises the Issue investigated in this post (a little bit off-topic but interesting though):
"why the unpacked version of the binary executes on Windows XP but not on Windows 7 even though the packed version executes without any error on both platforms?"
.::[ ISSUE ANALYSISAfter loading the unpacked version of the binary on IDA we could notice that the executable was compiled by using some version of Visual C with the flag "
GS" active [
4][
5]. This flag tells the compiler to inject code to check the software against buffer overflows. The code implements a set of
cookies based routines to check if the boundaries of variables are not violated. Figure 05 shows the code inserted by the compiler used to generate this security
cookie.
Why we are talking about this? Because the debugger reports a memory access violation when the program tries read the security cookie initialized and stored inside the data segment by the function "
__init_security_cookie()". Figure 06 shows the exception triggered by the debugger and the defective code.
 |
| Figure 06: Exception triggered when executing the unpacked binary. |
An interesting behavior is that the code is modified when executed from:
to:
This runtime change is causing the error because the register
DS (
Data Segment register) is not initialized with the base address for the
Data Segment. Well, the
Data Segment Register should be filled dynamically according the
Relocation Table [
6][
7] and is used for
ASLR [
8]. The problem is that the binary does not have
Relocation Table (probably striped by
UPX) and was compiled with the
ASLR flag. This information can be confirmed by looking at the PE structure by using
CFF Explorer [
9] and
Process Explorer [
10]. Figure 07 shows the information about
ASLR flag at
Process Explorer. As we can see the process has the ASLR flag active.
 |
| Figure 07: Process characteristics interface showing that ASLR flag is active |
We can double check and edit characteristics of the binary by using
CFF Explorer. Figure 08 shows this same information
ASLR flag on
CFF Explorer but this time this tool was used to unset this flag.
 |
| Figure 08: unpacked binary characteristics on CFF Explorer |
Once the flag was disabled the binary does not uses
ASLR and does not requires the
Relocation Table anymore. We can observe now on Figure 09 that the unpacked binary is executing normally on
Windows 7.
 |
| Figure 09: Unpacked binary is executing fine after ASLR flag was disable |
The unpacked binary was executing normally on
Windows XP because this version of
Windows Operating System does not implement
ASLR (
ASLR was implemented for the first time on
Windows Vista).
.::[ CHALLENGE 04 - HIGH LEVEL BEHAVIOR
No more obscure errors, now we can finally focus on the challenge. The first thing to notice in this challenge was the presence of
UPX. Another interesting characteristic is the difference of output between the unpacked and the packed version. The only reason for such thing is that the unpacking algorithm is modifying the unpacked binary during execution time. After analyzing the end of the algorithm used for unpacking the original code, just before redirecting the execution flow for the
Original Entry Point, some routines was injected to modify the unpacked binary. There are
2 modification routines:
- replaces a "5" by "4" in a specific position of the memory;
- switch the cases of an array of characters ("A" goes to "a", "B" to "b" and so on) .
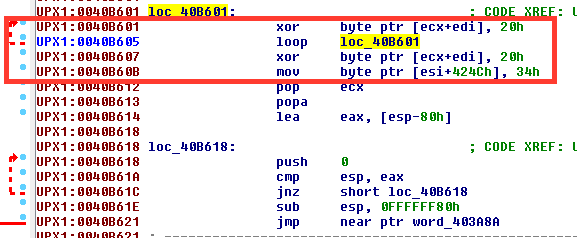
Figure 10 shows the changes made by the modified version of the UPX unpacking algorithm over the packed binary. It is possible also to see the jump to the
Original Entry Point at address "
0x408621" this instruction changes the execution flow to the beginning of the
UPX0 section.
 |
| Figure 10: changes made by the modified version of the UPX unpacking algorithm over the packed binary |
In order to use the unpacked version of the binary for analyzing the challenge it is necessary to manually patch the unpacked binary and add the modification code injected inside the unpacking algorithm.
The first patch can be achieved by changing the byte at the offset "
0x3c4c" from "
0x35" (string "
5") to "
0x34" (string "
4"). The second patch can be achieved by changing the content starting at the offset "
0x3bb8" until offset "
0x3beb". It is necessary to switching the case of all alphabetic characters ("
A" goes to "
a", "
B" to "
b" etc). Figure 11 shows the changes for the second patch.
 |
| Figure 11: second patch which swap the case of the characters for a specific region in memory. |
By now we have restored the original binary and we are ready to start to analyze what is necessary to solve the challenge.
The first thing to notice is the verification code to check if the binary was unpacked properly. This code checks if the static string located inside "
0x0040525c" (labeled as "
Str" by IDA) is not equal to "
5". Remembering that the customized unpacking algorithm replaces this string with "
4" during execution time. The routine calls the function "
atoi()" to transform this string in a integer and makes the comparison. Figure 12 shows the unpacking checking routine.
 |
| Figure 12: unpacking checking routine |
The second thing to notice is that the binary expects a parameter. Figure 13 shows the routine which checks the number of parameters passed to the binary.
 |
| Figure 13: Routine which checks the number of parameters passed to the binary |
The third relevant code is the call to the the function "
localtime64()" which returns a structure containing the current time at the system. Figure 14 shows the code which calls this routine. Another interesting thing to notice at this routine is a code to calculate a
MD5 hash of the inputed parameter (first red rectangle). The function "
sub_4012E0" calculates this
MD5 hash.
 |
| Figure 14: localtime call routine. |
At this point we know that the binary receives an
integer parameter with maximum 8 bits (because the mov instruction receiving "
al"). Well we could just ignore the rest of the code and brute force the binary with values between
0 and
256. This can give us the flag and solve the challenge. But our target is understanding the behave of the code then we should move on.
The next characteristic is that the binary collects the local hour at the system and user this integer to as an index for an array containing
24 strings encoded with
Base64. Inside each component of this array has an encoded
MD5 hash. This hash is compared with the
MD5 hash calculated by using the input argument; if it does n
ot match the binary exits. Figure 15 shows the code responsible for collecting the hour in the host system.
 |
| Figure 15: collecting the hour in the host system |
Figure 16 shows the function responsible for using the current hour for indexing the array with the hashes in
Base64 format.
 |
| Figure 16: accessing the "hashed" hours vector |
The function in "
sub_401000" is responsible for decoding the content and compare the decoded hash with the one calculated by using the current hour. This is the necessary information to solve the challenge, we know that the binary expects as parameter the current hour of the host system. Figure 17 shows the resulting output by inserting the current hour as first parameter to the binary.
 |
| Figure 17: Binary executed with the current hour of the system as a parameter. |
The challenge is solved but we still want to understanding the rest of the analyzed binary. Well by observing the graph generated by IDA we can observe that the _main function flow structure can give us some hints. Figure 18 shows the flow graph of the main function calculated by IDA. We can observe that the main function has basically
2 sequences of code with
24 functional blocks each.
 |
| Figure 18: Flow graph of the _main function generated by IDA. |
The first set of blocks is responsible to building the vector containing the encoded hashes for numbers between
1 and
24. This is used to verify if the user is inserting the expected time as a parameter to the binary. The second set of blocks builds another vector containing an encrypted version of the flag for each hour. The hash representation of the hour is used as a
XOR key for decrypting the flag. Figure 19 shows the final decryption routine which is used to recover the flag.
 |
| Figure 19: XOR decryption routine |
That's all folks!
PS: during my journey to understanding how relocation tables works, I found a very interesting article about
code injection [
11]
..::[ REFERENCES
[1]
http://www.flare-on.com/[2]
http://solidsec.blogspot.de/2015/10/ctf-fire-eye-flareon-2015-challenges-1-3.html[3]
http://upx.sourceforge.net/[4]
https://msdn.microsoft.com/en-us/library/8dbf701c.aspx[5]
https://msdn.microsoft.com/library/aa290051.aspx[6]
https://en.wikipedia.org/wiki/Relocation_(computing)[7]
Windows Internals (Chapter #4)[8]
https://en.wikipedia.org/wiki/Address_space_layout_randomization[9]
http://www.ntcore.com/exsuite.php[10]
https://technet.microsoft.com/en-us/sysinternals/processexplorer.aspx[11]
http://www.codeproject.com/Articles/12532/Inject-your-code-to-a-Portable-Executable-file


No comments:
Post a Comment